
Saturday, December 11, 2010
Ekimura's Blog Giveaway
Eki from ekimura is doing a Melliesh lip gloss & Coach Christmas Giveaway! Check it out on her blog!

Friday, November 26, 2010
Black Friday
 Today was Black Friday. Well.. The festivities aren't over for everyone, but I'm done for the night hahaa. I bought a few things today. I woke up at 8 am, my brother drove me to the mall near my town where I bought two dresses from the Fashion Finds. It was the two dresses in the H&M Black Friday Ad. 5 dollars!! It was super cheap so I bought both the red one and the black one. Of course, the actual dress was a lot more ruching, but you know, it was originally a $9.95 dress so what do you expect?
 I met up with my family friends and we ventured around the mall. I didn't really buy much, I wanted to but I resisted haha. I kept searching for Katamari Damacy all day with no avail.. Ugh! More searching haha.
Later we went to see Tangled. It was such a cute movie! I heard they tried to gear it towards boys with the main male character. I really liked the movie. They changed a few parts from the traditional Rapunzel story which was interesting. I'm so tired right now, so I can't really give a better review xD
 We went back to the mall afterwards. There were two GameStops in the same mall.. So I went in and bought some games. They were having a sale of buy 2 used games, get 1 free. I'm usually very reluctant to buy used games, but some games are just so hard to find now a days! I bought "Final Fantasy VII: Dirge of Cerberus," ".hack//infection" (I've always wanted to play the series after I fell in love with the original anime.. They had .hack//mutation too, the sequel to infection.. should've bought it.. xD), and "Okami" (it was between that or Resident Evil, but they didn't have the first one..). Shall have fun playing them :D There are a lot of games I want actually.. but that's besides the point haha.
After that I didn't really do much, my family friends had to leave and I met up with my mom and cousin in the mall. Got Häagen-Dazs ice cream! So yummy. I was literally out of the house for a good.. 10 hours haha. It was a lot of fun! But.. so tiring..
Tuesday, November 9, 2010
Celestial Skies
At approximately 10:40 pm on October 13, 2010 something great happened.
Celestial Skies was born. Our dream.
I've always wanted to be part of a cosplay group. It's always fun to cosplay with other people who share your passion and have the same interests as you! During the summer at AnimeNEXT, among the many people I met, I met ~Lingering-Tears We kept in contact and began planning for future cosplays with each other (the amount of things we want to do is unbelievable xD) and we had both shared that we wanted to join a cosplay group and decided to form our own!
For the past week, we had been trying to come up with a name. It had to be epic, but have meaning to us. A name worthy for a cosplay group.
We bounced around ideas, and nothing really stuck out to us. But one night, she came up with the name. Celestial Skies. She told me about it and we discussed a deeper meaning behind it. You can read what she wrote in her journal.
We also summarized it into a poem. The poem in our group was the edited version. This was our first draft:
Can one daydream at night?
Or are they merely dreams?
The sky is the path on which dreams take flight
Under the bright moon’s beams.
This is our dream, our vision.
Our heaven, a paradise.
Divine, ethereal, immortal, otherworldly.
The path on which our dreams can take flight.
This is our goal, our focus, our inspiration.
Thus ~Lingering-Tears and I have created a cosplay group!
. : Celestial Skies' Links : .
Tuesday, October 19, 2010
New York Anime Festival/Comic Con 2010
 October 9th, I went to NYAF/NYCC! I really only planned on going for Saturday only because i'm going to school in Philly, so it would've been inconvenient going on Friday. Sunday was my catch up day for homework, and I have early classes so I didn't want to end up being out too late. So my original plan was to go on Saturday, wake up at 8:15, leave to take the bus to the Greyhound station at 9:30, take the 11 o'clock Greyhound, be there at 1. Then go back to Philly on the 8 o'clock Greyhound to arrive back at 10:20, then get back to school by/before 11. Sounds good right? Here's what ended up happening.
 I woke up at 8:15, had to go to my friend's dorm because he had to take a shower and he was going with me. Started doing my make-up and freaked out because I couldn't print out my ticket the night before. I had assumed it was a computer issue because it happened on two different computers. My friend changed his ink cartridge and it just didn't feel like cooperating. So it was around 9:20, we decided to split up. I was going to go to the library to print out my ticket, and he'd go to the campus center to buy tokens for the bus. The library wasn't even open and no one was at the front desk in the campus center.
So I called my friend as a last resort, and she said she'd drive us to the Greyhound station. So we went back to my friend's dorm in an effort to print out these tickets. I ended up taking the old black ink cartridge he had replaced and shook it and said, "If it prints out, then it's meant to be." And it worked!
 My friend drove us to the Greyhound station and we ended up going on the 11:30 bus because the 11:00 one was full. By the time we got to the Javits Center it was about 2:20. There were so many people! It felt great going to a convention and cosplaying again. I met one of my photographer friends, Powdy, with his group from Photography X. Met a Cloud and Aerith, had epic pictures taken with the two. Met up with TheBigTog, chatted for a bit, then I went to the Final Fantasy photoshoot which was supposed to happen.
I met up with the Cloud, and there were literally no one there! I met Haruhi and Ranmaru of the NYCCosplayers group who cosplayed as Tifa (AC version) and Vincent respectively. Then we met a Barret, then another Tifa (Original version), her friend a Squall, a Lightning, Fang, a Sazh who stayed for a little bit, a Rinoa for Squall xD, a Chocobo, Moogle.
Sooo many people wanted to take our pictures hahaa. I felt bad for the ones who had to hold weapons xD Afterwards I met up with another of my photographer friends, Baldwin and later Youkuro. We were all really bored, so Baldwin and I had a mini photoshoot. No convention experience is complete without me doing a photoshoot xD So it seems. After that we went to the Dealer's room, I tried on a corset. If it weren't 200$ I would've bought one. It helped my posture xDD
That was pretty much my NYAF/NYCC adventure! Did you go to NYAF/NYCC? Tell me your stories! ^^
Thursday, September 30, 2010
Miku Hatsune

Name: Miku Hatsune/初音ミク
Appearance: Vocaloid 2
Variation: "Magnet"
Height: 5'3"
Description: The first product in the Vocaloid2 Vocal Series. It is considered as the most popular and well known Vocaloid. The name of the title and the character of the software was chosen by combining Hatsu (初, first), Ne (音, sound), and Miku (未来, future) thus meaning "the first sound from the future."
Worn at: Northern NJ Cosplay Picnic 2010, Tokyo Fashion Festa Part 2: Cosplay
Why I chose this costume:
This one is an interesting story as well. My friend uploaded a picture of a pink wig for her Kururu from Air Gear cosplay and I told her it reminded me of Luka Megurine from Vocaloid. Somewhere in the conversation I suggested doing a Vocaloid group cosplay, and we ended up choosing the song "Magnet," because the outfits were the easiest. I was originally unsure if I should be Miku or Rin, but then I ended up choosing Miku so my friend and I could cosplay together.
Mechanics of the outfit:
I already had a black dress, so I used that as a base. For the waistband, I took a piece of white cotton (I want to say) bought some black floral lace. Then I realized that I was supposed to buy white floral lace.. But I had already asked the worker there to cut the fabric so I had to work with it. I sewed the black lace onto the cotton to create a waistband. I had originally pinned it, but I realized (since I made the waistband for my Luka) that the waistband would droop, so I'm going to lightly bast it on the dress (since neither of us want it to be permanent).
The hardest part was the headphones. I used this Youtube video tutorial as a guide. I'm going to post an actual tutorial for this later on. The contact lenses are Dolly Blue.
For the wig, I originally wanted to put pigtails in the wig, but I realized I couldn't make high pigtails without stubbing it. I also realized there's another costume I could use this wig with that I wanted to do, so I didn't want to end up chopping off the hair. I didn't buy one with pigtails because I didn't want to spend that much money to use on one cosplay, and there aren't many costumes with just short blue hair. So I just left the hair the way it was. More information on the wig can be seen here.
Personal Feelings:
I had fun with this costume. I don't think I'll do Vocaloid for a while though haha. It's very popular right now, and I tend not to pick costumes that are super popular because then everyone else is cosplaying them as well. There aren't too many Vocaloid ones that I actually want to do. The only outfits that I really love is from "Sandplay: Singing of the Dragon." For more images, check out my deviantArt!
The images are copyrighted to their respective owners. © TheBigTog, Carroll Kong, and Andrew Baka
ReVamp (3/4/11)
I don't know why I said in my earlier post that I don't think I'd ever cosplay Vocaloid again. After listening to more songs.. I would definitely cosplay Vocaloid again! Anyways, here is the revamped version. Almost everything was revamped.
The wig was borrowed from my friend, Kitsy Dolly. The hat and headphones remained the same. New dress, same shoes, and the gloves and stockings were borrowed. The images are the same as the ones from my other post from Tokyo Fashion Festa.
Pichu Gijinka

Appearance: Pokemon Generation II
Copyright © 2010 Knightmare6 (Philip Ng). All rights reserved.
Variation: Gijinka
Height: 1'00"
Type: Electric
Description: known as the "Tiny Mouse" species of Pokémon, are the pre-evolved version of Pikachu. Pichu is a small ground-dwelling rodent. Its fur is very short, and it has bright yellow coloration. The tips of its large ears are black, and it has additional black markings on its neck and short tail.
Worn at: AnimeNEXT 2010
Why I chose this costume:
There's an interesting story for this. My roommate is one of the reasons I got into cosplaying. I've always wanted to cosplay, but didn't have the skill or money for it. Then I learned that she cosplayed as well, so that pretty much started me off in cosplaying. She mentioned she was doing a Plusle and Minun gijinka with her best friend, so I was looking up Pokemon gijinkas to do. I thought, why not do a whole Pikachu family cosplay? I decided I was going to do Pichu and my friends volunteered cosplaying as Pikachu and Raichu. Thus, the Pikachu family is born!
Mechanics of the outfit:
My mom made the base dress and the petticoat underneath. I made the ears, and sewed on the collar. For the tail, I followed the reference picture and made sewed a ribbon in the back. For the shoes, I just wore a pair of yellow Harajuku Lovers converses that I had. I decided not to purchase a wig and just keep my natural hair. I originally had no intention of purchasing another wig because it would've been too expensive at the time.
The ears were the hardest part. I was feeling uninspired and short on time. I made ear covers with the fabric used for the dress, which was a terrible idea because it was a knit fabric so it was stretchy. I was originally going to put foam board inside the covers, and attach them to a headband, which completely failed. Then I used bubble wrap so it would be lighter, which sort of worked, but would have still failed. Suddenly I had an epiphany the night before I had to debut it. I put my hair in pigtails and pinned the ears to it. It completely worked. It flopped from now and then, but it still worked.
Disclaimer: The entire outfit is not made by myself.
Personal Feelings:
Ahh.. This was a fun cosplay. I don't think I'll do another Pokemon gijinka for a while though, haha. Unless I needed a cosplay and absolutely had nothing else to do. I guess because a gijinka isn't an actual official outfit. You could throw parts and bits together to make a gijinka, which makes it different and unique, but it's not official. There's nothing to base it upon. For more images, check out my deviantArt!


Copyright © 2010 Knightmare6 (Philip Ng). All rights reserved.
Kurama
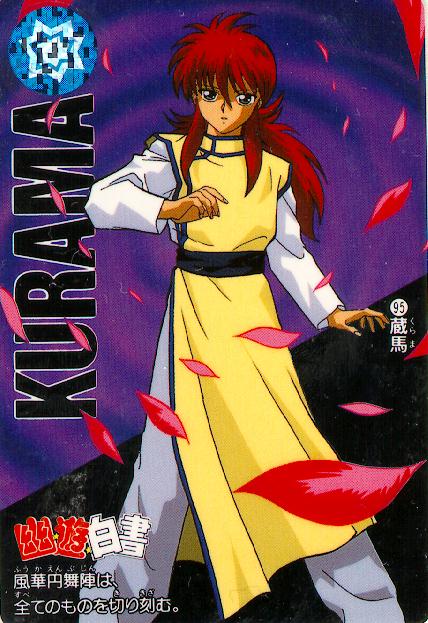
Name: Kurama/蔵馬
Appearance: Yu Yu Hakusho
Variation: Dark Tournament Outfit
Description: Kurama is perhaps the most calculating, cunning, and analytical member in the series and of the main characters. He is able to carefully look past his feelings and see the real situation at hand, demonstrated on more than one occasion. In battle, while his preference is to concoct strategies based on deducing his opponents abilities, he is quite cutthroat when the need arises.
Worn at: AnimeNEXT 2010, Northern NJ Cosplay Picnic 2010
Why I chose this costume:
If anyone knows me, my all time favorite anime is Yu Yu Hakusho, despite the fact that I have yet to actually finish the series.. But my favorite character is Kurama. I don't want to go crazy fan girl, but I absolutely love him. I'm going to stop there. I think I had originally wanted to make his school uniform, but was discouraged because.. well it is essentially a school uniform. So I decided to use one of his dark tournament oufits.
Mechanics of the outfit:
My mom helped me cut out the pattern, and sewed the collar. I sewed the blue lining. The white shirt I already had. For the pants, I took white sweatpants and sewed an elastic band on the inside. The rose whip is made by my friend, Youkuro, aka. my Hiei. The waistband was the remaining fabric from the lining, which I pinned in. The shoes were Tai Chi shoes that I had in my house. For the contacts, I used Dolly green. More information on the wig can be seen here.
Disclaimer: The entire outfit is not made by myself.
Personal Feelings:
I had fun with this cosplay haha. I met a bunch of crazy fan girls. I also met my Hiei at the convention I debuted it. I'm glad I got to cosplay as Kurama. ^^ For more images, check out my deviantart!


© 2010 TheBigTog. Any use of this photograph for ANY reason without the expressed written consent of the author is prohibited.
Tifa Lockhart

Appearance: Final Fantasy VII
Variation: Advent Children
Age: 22
Height: 5'4"
Blood Type: B
Description: Tifa Lockhart is a female protagonist in Final Fantasy VII. She is Cloud's childhood friend from Nibelheim and a member of AVALANCHE. Her personality is much more laid back and selfless in comparison, with a motherly streak concerning all her friends and her attitude to others. Tifa is quick to hide her true feelings her being shyness a key aspect of her character, and she is caring and loving to a fault.
Bright and optimistic, Tifa always cheers up the others when they're down. But don't let her looks fool you, she can decimate almost any enemy with her fists...
Worn at: AnimeNEXT 2010
Why I chose this costume:
Ironically, she wasn't my first choice. I wanted a third costume for AnimeNEXT and I was originally going to cosplay as Yuffie Kisaragi in her Advent Children outfit. I think I was partially discouraged from being Tifa. Then I decided I didn't want to cosplay as Yuffie, and wanted to cosplay as Rikku from Final Fantasy X-2. First her thief outfit, got shot down from that, then her songstress outfit, which was likewise shot down. Somehow I wound up back to Tifa and decided to just cosplay her.
Mechanics of the outfit:
I cannot even begin to describe what a pain in the butt it was to make this costume.. It wasn't the design that was the issue. It was the fabric. I didn't buy pleather, I want to say it's vinyl pleather, but I'm not totally sure. It was basically a knit (stretchy) fabric with a film of the shiny stuff on it. I had to experience this first hand when the film on the back of the pants started to melt(?) off. I think it was because it was hot and I was sitting outside during the convention. But the cape in the back covers it so it's not too big of a deal.
The only parts I made are the pants. The rest my mom made because I ran short on time (and I don't know how to sew a vest yet..). I cut up the shirt, the shoes, gloves, and ribbon I already had.
Disclaimer: The entire outfit is not made by myself.
Personal Feelings:
I have to admit, prior to cosplaying her, I never played the game. In fact, I still have yet to finish it! But I watched "Advent Children" and just been reading online, and the more I read the more I fell in love with her character and her personality. Her personality is somewhat similar to mine, and I love that she isn't like the generic female character, she's strong, a heroine even. For more images, check out my deviantArt!


© 2010 TheBigTog. Any use of this photograph for ANY reason without the expressed written consent of the author is prohibited.
Sunday, September 19, 2010
Yuna's Tiny Bee Guns
 Err.. Skipping cosplays haha. I haven't been able to work on a lot of stuff recently because I underestimated the intensity of some of my classes. They aren't difficult. They are just time consuming. I'm currently stuck on design homework, so I'm updating this blog.
Updating once every 2 weeks seems too little.. But we shall see what happens. My cosplay plans for 2011 are changing once again, so when the new year begins, I'll update it.. again.. haha. I have another surprise, but I'll announce it once it's confirmed ^^
In other news. I'm not sure if you know of Hiyoko-chan/Teeny from TotallyToasty, the girl from my previous posts with the awesome FFX Yuna tutorial. Well. I sincerely look up to her for her cosplaying, and the other day she said she was selling some of her cosplay things on deviantArt. One of the things she was selling that caught my interest was her FFX-2 Gunner Yuna Tiny Bee Guns seen in the image on the right.
 I do plan on cosplaying as her one day.. I also didn't want to have to go through the trouble of making prop guns. And Hiyoko-chan's craftsmanship is pretty high quality. Had to seize the opportunity ^^
I'm going to revamp them a little bit. There are just slight smears in some places and I want to fix the lettering on the guns. Nothing too serious haha. This way I can feel a slight sense of accomplishment.. ^^
Tuesday, September 7, 2010
2010 Northern New Jersey Cosplay Picnic
On August 14th, I went to the 2010 Northern New Jersey Cosplay Picnic in Chatham, New Jersey. The picnic was held at Passaic River County Park. It was held by the lovely Tanya Wheelock and her sister Autumn Wheelock. Where do I begin to describe this experience..
This was the first cosplay picnic I have ever attended. Overall, it was a lot of fun! It was only a small group of people, so it wasn't too bad. Getting there was probably the worst. There is no address for the place. The main road you take winds around. It took us at least.. half an hour of getting lost?
But all in all I had a blast! I invited my photographer friend I met at AnimeNEXT, TheBigTog. If you remember, he shot my [first] Tifa Lockhart photoshoot. ^^ Anyways, I did two photoshoots. The first, my friend (the Hiei from AnimeNEXT) wanted to do a "shipping" photoshoot for Hiei and Kurama. So I went to the picnic dressed as Kurama.
Then after the photoshoot was done, I debuted Miku Hatsune from Vocaloid, with her outfit from "Magnet," while my friend cosplayed as Luka Megurine. We debuted the headphones and waistband that I made ^^ I will be making a tutorial for the headphones soon!
After I did my Miku x Luka photoshoot, I just hung around with everyone and we went our separate ways. I made a bunch of new friends ^^ I had fun haha. Will definitely go next year if there is another one. I'm going to upload some photos from the two photoshoots in a different post. I had Miku shot a few times by several different photographers, but I think I'm only going to upload the ones TheBigTog photographed on Blogspot. For the others, check out my deviantArt!
Tuesday, August 10, 2010
Summoner Yuna Tutorial/WIP: Sleeves Gradient Dyeing

I followed Teeny's sleeves diagram seen on the right. This method is great especially when you're making the sleeves out of material like cotton, because then it's not too see through.
I originally cut mine on the length grain but messed up and ended up cutting it on the cross grain, but in the end it didn't make too much of a difference anyways. (For more information about fabric grain, check out this link!)
For the gradient look, I used RIT dye (powder) in Petal Pink. (I'll explain the dying process in a bit.) I realize that the sleeves are actually cream with the gradient dye, but I used white cotton. I dyed it before I put the sleeves together.
There's two reasons I do that, one is I cut more than I needed to to begin with. The reason for that is just in case you mess up or something, you can always chop it off. If you cut it exactly and you mess it up, you're stuck with it. The other reason is that I had originally sewn up another pair of sleeves (which I ended up disliking, the fabric was just wrong) and I'm not sure what kind of fabric is was but it wrinkled so easily and barely accepted the dye. That and I messed up when I cut it and didn't like the way I had ended up making it.
How long should you cut the fabric? Remember when you fold the fabric on the horizontal fold like the image, and place it on your arm (like you're wearing it) that's how long the fabric will be measured. How long you make it is up to you. For mine, if I stretched my arm out horizontally, it hit about mid thigh, and if I placed my arm on my waist right under the bust, it was just above the knee.
Dying Process
- This is a basic gradient dying tutorial, so you can use this for other colors if you want. This is just the method I used. This is the first time I did a gradient dye on fabric and it came out nice. If you have any suggestions to make this tutorial better, let me know!
Pre-treat your fabric! I personally didn't, because I just cut white fabric, but you should get your fabric as white as you can (you can use dye remover like the box suggests if you really want).
1. I folded the fabric like in the design. I dyed my fabric outside on the deck because I hear all these staining stories xD
2. I boiled a pot of water and poured it in the bucket I was going to dye my fabric in. If you don't want to ruin the bucket, just place a large plastic bag on the inside like I did. Just make sure the plastic bag doesn't have holes in it or it'll defeat the purpose of using it! The water doesn't have to to be bubbling boiling, just so it's hot!
3. You're going to use the fabric dye in rounds, not all at once. Take a water bottle you don't want and fill it up with the hot water. Use with caution! I shouldn't have to say this, but the bottle will be hot. Pour a little bit of the dye powder in the water bottle. I want to say less than 1/3rd of the packet.
4. The pour a little bit of the dyed water into the bucket. You don't want it too red, but not so little that it just looks barely tinted. Then I used a dowel rod that I had lying around the house to mix the water.
5. Before you dye the fabric, completely dip the fabric in warm/hot water before you dye it. You don't have to dye it in boiling water and I wouldn't recommend it, unless you want to burn your fingers. Don't worry, the dye won't run up the fabric from doing this.
6. Remember you're starting from lightest to dark. The gradient begins after where the sleeves would be, so I'd say start about 1 ft or so after the fold. Dip the fabric into the water. You don't want a line to appear so dip it in and out around where you're starting. You don't need to take the whole fabric out of the water each time, just so there isn't a line.
7. Continue doing this until you get to the end. Don't forget to add more dye each time. If you run out from the water bottle, simply add more hot water and dye, shake and pour some into the bucket. Then dip the fabric. I used the dowel rod to mix the fabric into the water.
8. For each layers, I switched between fabrics. I would dye one layer on the sleeve, then dye the other fabric. I wouldn't recommend dyeing both at the same time. I discovered that since I folded it and dyed it, the inside of the fabric was slightly lighter than the outside (which isn't too big of a deal since you can't see the inside anyways).
9. Leave the fabric out to completely dry.
Post-treat your fabric! All I did was rinse out my fabric in a bucket of cold/warm water. I basically dunked it in and out of the water, and swirled it around a few times, then poured out the water and repeated the process. Rinse it until the water is close to clear. I wouldn't recommend throwing it in the washing machine if you haven't sewn it yet because it will most likely fray like crazy! Also, it's not a lot of fabric to begin with so it'd just end up being a waste of water.
Notes: - Wear gloves! I didn't, because I didn't really put my hands in the water, but you never know!
- Wear clothes you don't care about. Even if you're very careful, you never know if the water could splash up and hit you.
- Post treat your fabric!
- Keep in mind that the color will become slightly lighter after you post treat your fabric. With that in mind, when you dye, dye it a tint darker. You don't need to over exaggerate it. If you want it to be a slight pink, you don't need to dye it pink-reddish. It won't fade THAT much.
- DO NOT directly pour the dye into the bucket of water, pour it in the water bottle first. THIS IS VERY IMPORTANT! Not only will you be more accurate when it comes to the amount of color you pour, sometimes if the powder doesn't dissolve in the water, you'll find random spots of color where the powder ends up clinging to the fabric.
- I did NOT use a lot of water dyeing this. I probably used less than 2 pots of water, and ended up using less than 1/2 the packet.
- Dyeing is pretty much based by sight, so I can't give you an exact measurement of powder to use or how long to leave it in.
Check out the next post for how to sew it together!
Summoner Yuna: Tutorial/Work in Progress

The version I'm using as my inspiration is the image on the right.
I'm going to write them in a series of posts, only because I am still currently working on it. I used very few patterns for this, but looked at some tutorials for ideas.
Credits: There are a lot of wonderful tutorials for Yuna that you can find all over the internet if you look. One of the places is on Cosplay.com That link shows you a lot of reference pictures for Yuna. Even the little details like her bracelets and rings and such. It also has great images for her obi and skirt design.
Another is a tutorial made by Teeny of TotallyToast. She includes a lot of design pictures on her approach of Yuna's costume. She made her based on accuracy (which is great for a perfectionist such as myself xD) and her cosplay is really remarkable.
Friday, August 6, 2010
2011 Cosplay Plans Update
Soo my cosplay plans changed a little. I'm still doing Yuna, Ringo, and Miku. I may not do Ciel Phantomhive anymore. I decided not to because Black Butler is still very popular so there will be 9483578495 Kuroshitsuji cosplayers.. I'd rather be one of the few people cosplaying a certain character. It's more fun that way haha. If there are so many of the same cosplay, unless yours is one of the best of them all, it'll just be looking at the same thing. So I have 3 new ideas. I also figure that if I go to Otakon next year, I need 3 epic cosplays xD
 One is Zhen Ji from Dynasty Warriors 6. She's one of the few female characters you can actually play in the game. She resides in the Kingdom of Cao, and her husband is Cao Pi. (hehe one of my favorite male characters) She's one of my favorite female characters. Sun Shang Xiang being my first of course.
Anyways, I was on Skype with one of my friends I met from AnimeNEXT. Somehow we got to the topic of Dynasty Warriors 6. He wanted to cosplay as Cao Pi and I said I'd cosplay as Zhen Ji (I like her outfit anyways ^^).
So we're going to do that for Otakon 2011, unless my other two cosplays I have planned fall through, then AnimeNEXT 2011!
 The next cosplay idea I have is a Sakura one from Tsubasa Reservoir Chronicles. I have to finish reading that actually.. But the storyline breaks my heart, even though I partially know what happens in the end, but still! I love the idea of a Sakura x Syaoran storyline.
This one is in the making actually, I'll most likely have this one for AnimeNEXT as well. I already began making the dress portion of it last night for no reason xD I just wanted to see if I could actually do it.
It's actually coming out pretty decent actually. It's long and flowy :D The only problem I have is that.. I didn't use a pattern when I made it. I sort of took a piece of fabric and started snipping and sewing away. Soo.. we'll see how it comes out in the end! ^^ If it works, I'll use it, if not, then I won't.

Last but not least! I wanted to do another cosplay, where the character had sort of a baby face or looked like a child. Mainly because.. I'll only look like a 12 year old for so long xDD Don't worry I'm not that young.. but I get that a lot hahaa, so I figure do all the children looking one before my face matures and I don't look like that anymore..
So I decided to do a Chii cosplay. I've always wanted to cosplay as Chii. There's one Chii cosplay that I make, it's my dream cosplay. But! My skill level isn't there yet.. So I don't want to make it at the moment. This is her from Tsubasa Chronicles, hence the animal-like ears. I'm probably just going to do her persocom ears.
 As sad as it is to say, this is one of her simpler ones xD I love a lot of her other outfits, but they're lolita-esque, so many of them are poofy, and I don't really know how to make the cosplay round like that.. And it doesn't help that I don't have a dress form either.. D: There is one other one I really want to do, but the way the picture is drawn, it makes no sense.
I really love this one, I like the idea of Chii as a princess, she looks really cute and elegant. But! This would only make sense to me if the opening was in the front, but the way the picture is drawn, it's open in the back. That and if it were opened that way, you can't have a petticoat. Without a petticoat, the dress wouldn't poof. Without a poof, it wouldn't be much of a princess dress.
If I can figure out how to do this one then I will. ^^ Oh CLAMP.. You and your gravity defying clothing.. >< But yeah.. these are my new cosplay plans.. So I'll end up having to do.. 6 cosplays next year?? o_O
I'm hoping to finish Yuna before next weekend.. Miku is pretty much done. Ringo is an easy one. Then there's these three.. xD Zhen Ji will probably be the hardest. Sakura, I pretty much have the base dress done. Chii.. I may just do a circle dress for the one.. Not sure yet..haha

Anyways, I was on Skype with one of my friends I met from AnimeNEXT. Somehow we got to the topic of Dynasty Warriors 6. He wanted to cosplay as Cao Pi and I said I'd cosplay as Zhen Ji (I like her outfit anyways ^^).
So we're going to do that for Otakon 2011, unless my other two cosplays I have planned fall through, then AnimeNEXT 2011!

This one is in the making actually, I'll most likely have this one for AnimeNEXT as well. I already began making the dress portion of it last night for no reason xD I just wanted to see if I could actually do it.
It's actually coming out pretty decent actually. It's long and flowy :D The only problem I have is that.. I didn't use a pattern when I made it. I sort of took a piece of fabric and started snipping and sewing away. Soo.. we'll see how it comes out in the end! ^^ If it works, I'll use it, if not, then I won't.

Last but not least! I wanted to do another cosplay, where the character had sort of a baby face or looked like a child. Mainly because.. I'll only look like a 12 year old for so long xDD Don't worry I'm not that young.. but I get that a lot hahaa, so I figure do all the children looking one before my face matures and I don't look like that anymore..
So I decided to do a Chii cosplay. I've always wanted to cosplay as Chii. There's one Chii cosplay that I make, it's my dream cosplay. But! My skill level isn't there yet.. So I don't want to make it at the moment. This is her from Tsubasa Chronicles, hence the animal-like ears. I'm probably just going to do her persocom ears.

I really love this one, I like the idea of Chii as a princess, she looks really cute and elegant. But! This would only make sense to me if the opening was in the front, but the way the picture is drawn, it's open in the back. That and if it were opened that way, you can't have a petticoat. Without a petticoat, the dress wouldn't poof. Without a poof, it wouldn't be much of a princess dress.
If I can figure out how to do this one then I will. ^^ Oh CLAMP.. You and your gravity defying clothing.. >< But yeah.. these are my new cosplay plans.. So I'll end up having to do.. 6 cosplays next year?? o_O
I'm hoping to finish Yuna before next weekend.. Miku is pretty much done. Ringo is an easy one. Then there's these three.. xD Zhen Ji will probably be the hardest. Sakura, I pretty much have the base dress done. Chii.. I may just do a circle dress for the one.. Not sure yet..haha
Wednesday, August 4, 2010
Tifa Lockhart Photoshoot: TheBigTog
I wanted to share some pictures of my Tifa Lockhart photoshoot to you ^^ It can be seen on my deviantArt as well, but this is for those who don't have it.
Cosplay made by my mom.
Series: Final Fantasy VII [Advent Children]
Character: Tifa Lockhart
Cosplayer: Me
Photographer: TheBigTog (his flickr)
Event: AnimeNEXT 2010
Please do not use these images without my or the photographer's permission. Thank you! If you see these images used without my permission, please let me know!


Click the image for full resolution.
Circle Lenses Seller Review: ♥╮Barbie Eye╭★隐形眼镜
So I needed some green contact lenses for my Kurama cosplay (which I wore a few posts ago). When it comes to buying circle lenses online. There are a lot of people who sell them online. I'm not saying all of them are reliable, but you can find a lot of sellers. Some sell them really cheap, some more expensive.
I hate to say it, but it's sort of luck sometimes when you order them. Unless it's from a reliable website. Other times, you have people selling them on websites such as Facebook.
The ones I wore are Dolly Eye Green. I ordered them from Ceramic Barbie on Facebook. Her group can be seen here. One reason I ordered from her is that she has a lot of good feedback. The lenses are.. not cheap haha. But, you get what you paid for. I previously had one bad experience with circle lenses, but this time I didn't.
This girl is a real sweetheart. She replied quickly and was very patient with me when I had a lot of questions. She also includes a free contact lens case. I would definitely recommend buying from her, unless you're one of those people who are skeptical about buying from Facebook or something. But that can't be helped.
The only con I can think of is shipping, which really wasn't that big of a deal for me since I ordered long beforehand. She orders by batches, and then has to order from the company, wait for them to ship it to her before she can ship it out. So if you need the lenses within a week, this probably isn't the place to look haha.
Pros:
- Excellent service
- Quick reply
- Very patient
Cons:
- Have to wait for batch to be over & company to ship over lenses
Price: 25$+ free shipping
Would I order in the future? Most likely. ^^
eBay Wig Review: superoutlet-2009
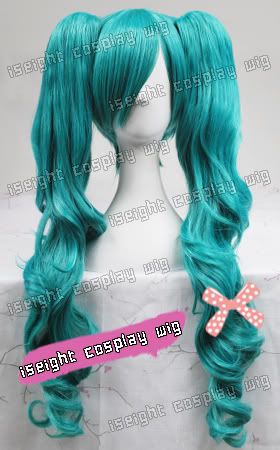
I needed a wig for a Miku Hatsune "Magnet" cosplay. My friend and I are going to cosplay as Miku x Luka from Vocaloid 2 for this cosplay picnic next weekend. I was basically frantically searching for a wig last week because sometimes shipping takes around 2 weeks, more so because the wigs I tend to like are overseas in Asia.
 I debated on getting a straight wig to put pigtails in (probably not the best idea) or to just buy the wig in the pigtails by itself (usually sold as a combination of a short wig and long pigtail clips). The issue with the latter is it would be more expensive, almost double the cost of a straight wig. I fell in love with this particular wig.
I pieced together some pictures from the product page. Usually when I buy wigs, I want to make sure they are heat resistant. You never know when you need to straighten/curl a wig.
This is the reference picture on the right. It's always a little tricky with Miku wigs, because in some songs, her hair is a darker or lighter shades than other songs.
Looking back on it, I sort of wish I got this one for only 45$ + free shipping. But a partial reason I didn't want to get it was because I don't know many cosplays with a bob haircut in that particular color. And what would I do with blue colored pigtails by itself anyways?
 Anyways, I had a positive experience with this seller. I ordered on July 25th, they shipped it the next day. I received it on August 2nd, so I got it within a week ^^ The shipping on eBay said 1-2 weeks.
I really love the quality and color of the wig. I didn't receive a wig cap like they said would come with it (as a free gift). But I already had a wig cap prior to this so it wasn't a huge deal for me. I won't go complain about it xD The one thing I was more interested in getting was the wig brush which I'm glad I have. It's so much easier to comb a wig now.
The quality is not bad. I'm not sure what type of fibers they use, because they don't list it. But it has sort of a chalky feeling, if that makes any sense. It doesn't feel like real hair like my red Kurama wig did. I wish I could upload a photo of me wearing it, but my camera makes the wig color look blue.
Rating: ★★★☆☆/ 3.5 out of 5.
Pros:
- Fair quality
- Shipped quickly
- Wonderful color, matches image
- Heat resistant
- Comes with a wig brush [and wig cap]
Cons:
- No tracking number
- Didn't receive a wig cap
- Has that synthetic feel
Price: 22.69$+9.99$ shipping = 32.68$
Item Location: South Korea
Would I purchase from them again? That's debatable. I didn't like the feel of it, and it tangles easily. I would have to really really love the color and not have been able to find it somewhere else. The wig color I received is not as bright as the one in the reference image, but it'd probably look be better in a brighter light. And you can't expect the color to be 100% exact as the image on the screen xD
If you wish to purchase this wig, search "GREEN BLUE Long straight cosplay party wig B207 F7G" in the eBay search bar, or look through superoulet-2009's eBay profile.
EDIT: This wig I received looks greenish blue, however for some reason, it photographs blue! Here is the post I made for the costume.
Kurama Photoshoot
Just wanted to upload some pictures from a photoshoot I did wearing my Kurama cosplay :D I actually cut the bangs this time. Still want to fix it a bit more, sort of rushed it again.. Hopefully I get to do my KuramaxHiei "shipping" photoshoot this summer as well ^^.
The outfit is made by me.
Series: Yu Yu Hakusho
Character: Kurama (Dark Tournament Outfit)
Model: Me
Photographer: Alan Banas
Do not steal or use these images without my or the photographer's permission! Thank you!


"Logic is panic's prey."
The outfit is made by me.
Series: Yu Yu Hakusho
Character: Kurama (Dark Tournament Outfit)
Model: Me
Photographer: Alan Banas
Do not steal or use these images without my or the photographer's permission! Thank you!

"The more impatient we are, the more mistakes we make."

"Suicide is not the answer.
There is neither honor nor redemption in that."

"I, too, have lived many years in shadow.
I just hoped your life could be more noble, than mine has been."

Saturday, July 31, 2010
Luka Megurine "Magnet" Headphones

I had fun making this.. But the hardest part.. were definitely the wings.. Those were a pain in the butt!
But! I love the way it came out :D
Credits:
Inner circle design created by my friend, ~Raydiant
Butterfly Wing Template created by ~Fenlaf and the image can be seen here
Youtube Video that I used as a guide (didn't follow it 100%) can be seen here!
I may make a tutorial of how I did mine, not 100% sure yet. Click the image for full resolution! Also, do not steal my image without my permission! If you see anyone doing so, please let me know!
Thursday, July 1, 2010
Craft Goodies Update
My mom went to Taiwan a while ago and bought me a bunch of goodies that I requested xD
 Click the photos for high resolution xD
Ahh it's a little unclear, but that's everything! ^^
I'm going to go through the items separately :D

Asian craft books! :D
They are all clay craft books from learning how to make bears, to flowers, to cute food crafts, to realistic little foods!

Nail art stickers!! :D
I need to use up my old ones actually..
I love having nail stickers, I just hate using them because I'm afraid I'll use it and not like it or they could look better on something else.. ^-^;;

500 piece clear fake nails :D
Could make 50 sets of random nail art lol
Hopefully to sell ^^

BB cream! It's all the rave in Asia.
May do a review on it or something.
The one on the left has Jolin's face on it haha, the "bootleg" kind apparently and the one on the right my aunt bought when she went to Korea.

Hehe my mom knows I love learning Japanese xD
She bought me a learning Japanese book.
Too bad it's for a native Chinese speaker learning Japanese instead for a native English speaker learning Japanese.. xD
 Cell phone straps!
Enough said ^^
Debating if I should try to get a table for.. MangaNext.. since its more Artist Alley based..
But I don't want to try to get a table and not end up going.. since I'm not 100% sure yet..
 Fimo sticks!
Usually for nail art and crafts and such.
I've made a few of my own xD But never bought them.
Shall see how they work out.. I tried making canes out of Sculpey but they sort of crumbled..

Domo! I wanted a giant domo plush..
But my mom already bought me a ton of crap, so she said no big domo D:


Ahh it's a little unclear, but that's everything! ^^
I'm going to go through the items separately :D

Asian craft books! :D
They are all clay craft books from learning how to make bears, to flowers, to cute food crafts, to realistic little foods!

Nail art stickers!! :D
I need to use up my old ones actually..
I love having nail stickers, I just hate using them because I'm afraid I'll use it and not like it or they could look better on something else.. ^-^;;

500 piece clear fake nails :D
Could make 50 sets of random nail art lol
Hopefully to sell ^^

BB cream! It's all the rave in Asia.
May do a review on it or something.
The one on the left has Jolin's face on it haha, the "bootleg" kind apparently and the one on the right my aunt bought when she went to Korea.

Hehe my mom knows I love learning Japanese xD
She bought me a learning Japanese book.
Too bad it's for a native Chinese speaker learning Japanese instead for a native English speaker learning Japanese.. xD

Enough said ^^
Debating if I should try to get a table for.. MangaNext.. since its more Artist Alley based..
But I don't want to try to get a table and not end up going.. since I'm not 100% sure yet..

Usually for nail art and crafts and such.
I've made a few of my own xD But never bought them.
Shall see how they work out.. I tried making canes out of Sculpey but they sort of crumbled..

Domo! I wanted a giant domo plush..
But my mom already bought me a ton of crap, so she said no big domo D:

Some empty cases.
Originally for my nail art jewels and such.
But I pretty much filled mine up so I might just decorate it or something xD

Ahh .. where to begin. silver and gold eyepins!
There are also some lobster clasps.
And barrette and ring blanks.. :D
I hope you enjoyed this update! ^^ My summer classes are almost over so I should be working on more crafts ^^ If not.. I'll probably be playing Final Fantasy X-2 or working on cosplays. :]
Subscribe to:
Posts (Atom)