Showing posts with label tutorial. Show all posts

Wednesday, April 13, 2011

ebay Wig Review: peaceofworld2010

So AnimeNEXT is coming up very soon! I recently ordered my FFX-2 Gunner Yuna. I intentionally wanted the wig to be different from my FFX Yuna wig. So I opted for a darker brown.

The wig ended up being slightly darker than the image. But you can tell it's not black and under the  light, it's lighter. It has nice highlights like my FFX Yuna wig, which I did enjoy.

And it was a lot longer than I thought it would be, which isn't that big of an issue.

I'll take another picture when it's less icky/rainy outside.

Rating: ★★★★/ 4.5 out of 5.

Pros:
- Very fast shipping.
- Soft fibers.

Cons:
- No tracking number.
- Not heat resistant.

Price: $22.99 + FREE SHIPPING.
Item Location: China.
Time for Arrival: 9 Days.

Would I order from them again? Yes.

If you wish to purchase this wig, search "J·C New Fashion Dark Brown Staright Women's Full WIG," or search in peaceoftheworld2010's ebay profile.

Monday, March 7, 2011

eBay Wig Review: rixinyueyi9898

As you know, or don't know, I'll be cosplaying Final Fantasy X Yuna (summoner) this year! I planned on debuting her earlier at SpringFest this Saturday, so last week I ordered her wig.

The wig came out a lot curlier than the image (which isn't an issue). The fibers were really soft. The wig is a bit darker than I had anticipated and wanted for Yuna, but in the light it looks lighter.

The only possible issue I could have with it, is that on the website, it says the fibers were Kanekalon, but then on the tag the wig came with, it says it was synthetic fibers. Not that it mattered either way for me because the fibers were super soft. I'm not sure if it was because it wasn't as thick as my other wigs, but it hardly tangled. There was virtually no tangle with this wig.

What I liked about this wig, and the reason I chose it is that the color looks very natural that it has highlights and such. Nothing too noticeable, but you can tell it's not just one straight color.

Rating: ★★★★★/ 5 out of 5.

Pro:
- Great Quality
- Quick Shipping
- Came with free wig cap
- Soft fibers

Con:
- No tracking number
- Not heat resistant

Price: $24.30 + FREE Shipping. (It was 10% off.)
Item Location: China
Time for Arrival: 10 Days

Would I order from them again? Yes.

If you wish to purchase this wig, search "1813 New long Light Brown Fashion Wavy Wig" in the eBay search bar or look through rixinyueyi9898's ebay profile.

Tuesday, August 10, 2010

Summoner Yuna Tutorial/WIP: Sleeves Gradient Dyeing


I followed Teeny's sleeves diagram seen on the right. This method is great especially when you're making the sleeves out of material like cotton, because then it's not too see through.

I originally cut mine on the length grain but messed up and ended up cutting it on the cross grain, but in the end it didn't make too much of a difference anyways. (For more information about fabric grain, check out this link!)

For the gradient look, I used RIT dye (powder) in Petal Pink. (I'll explain the dying process in a bit.) I realize that the sleeves are actually cream with the gradient dye, but I used white cotton. I dyed it before I put the sleeves together.

There's two reasons I do that, one is I cut more than I needed to to begin with. The reason for that is just in case you mess up or something, you can always chop it off. If you cut it exactly and you mess it up, you're stuck with it. The other reason is that I had originally sewn up another pair of sleeves (which I ended up disliking, the fabric was just wrong) and I'm not sure what kind of fabric is was but it wrinkled so easily and barely accepted the dye. That and I messed up when I cut it and didn't like the way I had ended up making it.

How long should you cut the fabric? Remember when you fold the fabric on the horizontal fold like the image, and place it on your arm (like you're wearing it) that's how long the fabric will be measured. How long you make it is up to you. For mine, if I stretched my arm out horizontally, it hit about mid thigh, and if I placed my arm on my waist right under the bust, it was just above the knee.

Dying Process
- This is a basic gradient dying tutorial, so you can use this for other colors if you want. This is just the method I used. This is the first time I did a gradient dye on fabric and it came out nice. If you have any suggestions to make this tutorial better, let me know!

Pre-treat your fabric! I personally didn't, because I just cut white fabric, but you should get your fabric as white as you can (you can use dye remover like the box suggests if you really want).

1. I folded the fabric like in the design. I dyed my fabric outside on the deck because I hear all these staining stories xD
2. I boiled a pot of water and poured it in the bucket I was going to dye my fabric in. If you don't want to ruin the bucket, just place a large plastic bag on the inside like I did. Just make sure the plastic bag doesn't have holes in it or it'll defeat the purpose of using it! The water doesn't have to to be bubbling boiling, just so it's hot!
3. You're going to use the fabric dye in rounds, not all at once. Take a water bottle you don't want and fill it up with the hot water. Use with caution! I shouldn't have to say this, but the bottle will be hot. Pour a little bit of the dye powder in the water bottle. I want to say less than 1/3rd of the packet.
4. The pour a little bit of the dyed water into the bucket. You don't want it too red, but not so little that it just looks barely tinted. Then I used a dowel rod that I had lying around the house to mix the water.
5. Before you dye the fabric, completely dip the fabric in warm/hot water before you dye it. You don't have to dye it in boiling water and I wouldn't recommend it, unless you want to burn your fingers. Don't worry, the dye won't run up the fabric from doing this.
6. Remember you're starting from lightest to dark. The gradient begins after where the sleeves would be, so I'd say start about 1 ft or so after the fold. Dip the fabric into the water. You don't want a line to appear so dip it in and out around where you're starting. You don't need to take the whole fabric out of the water each time, just so there isn't a line.
7. Continue doing this until you get to the end. Don't forget to add more dye each time. If you run out from the water bottle, simply add more hot water and dye, shake and pour some into the bucket. Then dip the fabric. I used the dowel rod to mix the fabric into the water.
8. For each layers, I switched between fabrics. I would dye one layer on the sleeve, then dye the other fabric. I wouldn't recommend dyeing both at the same time. I discovered that since I folded it and dyed it, the inside of the fabric was slightly lighter than the outside (which isn't too big of a deal since you can't see the inside anyways).
9. Leave the fabric out to completely dry.

Post-treat your fabric! All I did was rinse out my fabric in a bucket of cold/warm water. I basically dunked it in and out of the water, and swirled it around a few times, then poured out the water and repeated the process. Rinse it until the water is close to clear. I wouldn't recommend throwing it in the washing machine if you haven't sewn it yet because it will most likely fray like crazy! Also, it's not a lot of fabric to begin with so it'd just end up being a waste of water.

Notes: - Wear gloves! I didn't, because I didn't really put my hands in the water, but you never know!
- Wear clothes you don't care about. Even if you're very careful, you never know if the water could splash up and hit you.
- Post treat your fabric!
- Keep in mind that the color will become slightly lighter after you post treat your fabric. With that in mind, when you dye, dye it a tint darker. You don't need to over exaggerate it. If you want it to be a slight pink, you don't need to dye it pink-reddish. It won't fade THAT much.
- DO NOT directly pour the dye into the bucket of water, pour it in the water bottle first. THIS IS VERY IMPORTANT! Not only will you be more accurate when it comes to the amount of color you pour, sometimes if the powder doesn't dissolve in the water, you'll find random spots of color where the powder ends up clinging to the fabric.
- I did NOT use a lot of water dyeing this. I probably used less than 2 pots of water, and ended up using less than 1/2 the packet.
- Dyeing is pretty much based by sight, so I can't give you an exact measurement of powder to use or how long to leave it in.

Check out the next post for how to sew it together!

Summoner Yuna: Tutorial/Work in Progress

I'm currently working on my Yuna cosplay, her FFX Summoner version. I wanted to do a partial tutorial/how I approached it. I just followed the game art version, not the FMV or CG version. There are slight differences in all of them, ex. in the game art version she has a light blue bead on the decoration dangling off the hibiscus flower while the CG version does not.

The version I'm using as my inspiration is the image on the right.

I'm going to write them in a series of posts, only because I am still currently working on it. I used very few patterns for this, but looked at some tutorials for ideas.

Credits: There are a lot of wonderful tutorials for Yuna that you can find all over the internet if you look. One of the places is on Cosplay.com That link shows you a lot of reference pictures for Yuna. Even the little details like her bracelets and rings and such. It also has great images for her obi and skirt design.

Another is a tutorial made by Teeny of TotallyToast. She includes a lot of design pictures on her approach of Yuna's costume. She made her based on accuracy (which is great for a perfectionist such as myself xD) and her cosplay is really remarkable.

Monday, December 28, 2009

Christmas Festive Nail Tutorial

This is a bit late, but here is a Christmas Nail Tutorial! I hope everyone had an awesome Christmas and Happy Holidays to all! I will post a video tutorial for it later.
All You Need is:
Skin Food White Nail Polish
ABSOLUTE! Nail Polish in Twinkling Gold
ABSOLUTE! Nail Polish in Pine Green
Q-Art Print Red Glitter Nail Polish
Kiss Glass Shine Topcoat
First, begin with clean nails. Get rid of any old nail polish. Use nail polish to remove natural oils. This makes it easier to prevent peeling. I like to use Prep N’Clean Dehydrant by A.S.P. because it dehydrates my nails by removing its natural oils and removes dirt.
Next, apply your white nail polish. Make sure you apply a nice even coat.
Now take your green polish and apply it diagonally across your nails. The one I used is slightly glittery. I used a striper polish for this.
Now it is time for your gold polish. Paint a stripe across, separating the white and the green. Make sure it’s thick enough to be noticed, but not too thick or it looks a little sloppy. [NOTE: I know that I painted the gold polish first, but I realized that it would probably be easier to paint the red nail polish first.]
Next, take your red nail polish and make a few vertical striped on your nails. I used a red glittery polish. If you use a glittery polish, it tends to come out thin, so I made stripes as a guideline so they weren’t too smushed together before thickening the color. I used a striper polish for this as well. It makes the application a lot easier. If you don’t have a striper polish, you can try using tape to align it or use red acrylic paint and a thin paintbrush.
You are almost done! Now apply your topcoat and clean up around the nails. There are two ways to do this. You can use a q-tip soaked in nail polish remover and carefully wipe away the excess nail polish. The problem with this technique is that if you are not careful, you might accidentally wipe away your hard worked painting. But if you are careful you should be fine. The other technique that I like to use is first, to make sure your nails are completely dried. Then soak them in warm-hot water for a little bit. The nail polish on your skin will soften and you can pick it off. Make sure you don’t end up peeling off your skin though!
Now you are finished! Here is your finished product!
I hope you enjoyed this tutorial even though it’s a little late! Stay beautiful!
-Kawaii Riceball

Thursday, November 26, 2009

Nail Max! Inspired Black Sparkly French Tutorial

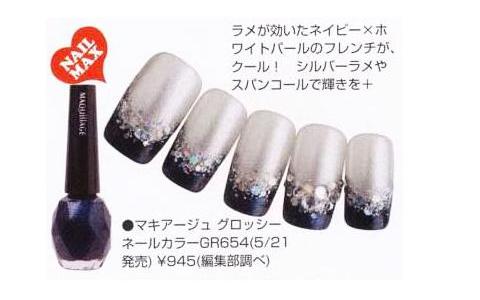
This is a tutorial to help you create elegant and stylish looking nails! This was a look inspired by a look in the Japanese nail magazine, Nail [ネイル] Max! You can check out the video version by click here!

All You Need Is:

Cover Girl’s Continuous Color 3 in 1 in Crushed Pearls
ABSOLUTE! Black Nail Polish
Cover Girl’s Boundless Color Silver Glitter Nail Polish
N.Y.C. Starry Silver Glitter Nail Polish
Silver Glitter, Rhinestones, and Toothpicks
Kiss Glass Shine Top Coat

NOTE: You don’t have to use these specific brands! These are the ones I used :]

Here is the inspiration;

First, prep those nails! I used Prep N’Clean Dehydrant by A.S.P. because it dehydrates my nails by removing its natural oils and removes dirt. This makes it easier to prevent peeling. But don’t worry if you don’t have Prep N’Clean Dehydrant, nail polish remover works just as well.

Now, apply your shimmery basecoat. You can use just a plain silver shimmery one or one with a pink tint. Here I used a shimmery pink tinted polish. This will protect your nails and keep them looking smooth and it helps if your nails are slightly discolored. You don’t need to apply too much.

Next, apply your black polish! I realized that in the picture they used a navy shimmery polish.. But they’re your nails, you can do whatever you want with them haha. Now paint along your ‘C’ curve. If you’re not good at it, that’s all right! Just use smaller strokes. Sometimes you just have to paint how you think it looks. Not everyone’s ‘C’ curve is perfect, and here, the shimmery pink polish made it difficult to see where the curve was. You can also extent the strokes past the ‘C’ curve. This helps make your nails look longer. But remember! If you paint too much past your natural curve, it can look awkward.

Next, you need your shimmery glitter polish! Apply it along your ‘C’ curve. You do not need to apply too much because we will be applying more glitter later on.

Now, apply your Starry Silver Glitter Nail Polish. Apply it the same way you apply your shimmery glitter polish! The main reason I’m using it is for the glitter portion, because the N.Y.C. Starry Silver Glitter Nail Polish has bits of different glitters. Gently dab it on. Do not glob it on! Not only will it take forever to dry, it will come out chunky!

For the next step, you need silver glitter and some toothpicks. It will pick up more glitter this way. Pour a bit of glitter on a piece of paper. The reason for this is so you can pour the excess glitter back into the jar. Also, this type of glitter sticks very easily. If you happen to get it on your table, a moist paper towel should be enough to remove it.

You can break off the tip of the toothpick to make it more blunt. For easier application, dab the toothpick in some clear polish and dab it in the glitter. Apply it along your ‘C’ curve.

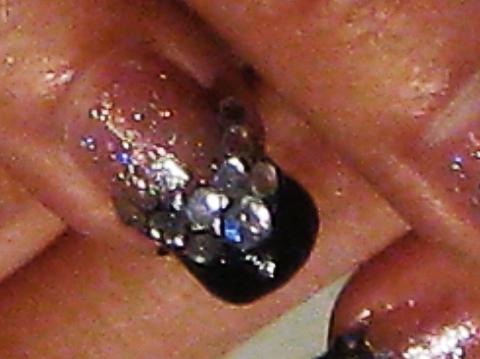
When that’s done drying, get out your rhinestones! I used brush on nail glue to help it stick more. You can also use clear nail polish. I only applied the rhinestones on my ring finger nails. Here I used two different sized rhinestones. Apply the smaller ones along the ‘C’ curve on your ring finger. If you are using nail glue or polish as adhesive, don’t press them on all the way. Just in case you mess up, you can always move them around.

Place the bigger rhinestone in the middle under the smaller stones. Now place two smaller rhinestones next to it.

Finally, your topcoat! For the nails with the rhinestones, apply the topcoat around the stones. You can apply it over, but I’ve never had great results from doing so. So I’d advise you not to. I try to apply a thin layer of topcoat so it does not peel off as easily. And now you are finished!

Here is a picture of my nails using the shimmery pink polish.

And a picture using the shimmery silver polish.

I hope you enjoyed this tutorial! Stay beautiful ^-^

-Kawaii Riceball

Tuesday, September 29, 2009

Midnight Sparkly Nails Tutorial


Here is a tutorial to show you how to create a simple but fashiony look! You can check out the video version by clicking here!
All you need are:
Skin Food Base Coat
ABSOLUTE! Black Nail Polish
Boundless Color Silver Glitter Nail Polish
N.Y.C. Starry Silver Glitter Nail Polish
Kiss Glass Shine Top Coat
NOTE: You don’t have to use these specific brands! These are the ones I used. :]
First start out with clean nails! If you want to prep your nails beforehand, use nail polish remover. This will remove your nails of its natural oils and make it easier to prevent peeling.
Next, apply your basecoat. Here I used one with a pink tint. This will protect your nails and keep your nails looking smooth and if your nails are slightly discolored.
Now apply your color! Here I used black, but you can also vary it and pick another color. Just paint a straight line across. I used a striper brush so it was easier to apply. If you have short nails, use smaller stroke. TIP: For shorter nails, you can paint past the ‘C’ curve to make them look longer. But don’t paint past the middle or it’ll look awkward.
Next your glittery polish! Apply across just like the black nail polish. You can stop here if you want and you’ll have a nice Frenchy look. Also, do not apply too much. Just a thin strip! Remember, less is more.. sometimes.. haha.
Finally, the Starry Silver Glitter! Don’t apply it all the way. Start from a little above the middle to the end. That gives it a more gradual look.
ou can apply a top coat after this step. I didn’t apply one this time, because personally it makes my nail polish peel more easily. But it makes your nails shiny and protects your design ^-^ And here is the final result! You can do other color variations. ^-^