Showing posts with label fashion. Show all posts

Tuesday, May 3, 2011

Sakura Matsuri Report.

I went to Sakura Matsuri this weekend! I went Saturday after my drawing class. I wore a 90% completed Rei Ayanami in her school uniform. The only things that weren't finished were the buttons and collar.

The highlight was that we went to "Tasty Hand Pulled Noodles" in Chinatown. It was featured on 'The Best Thing I Ever Ate' on Food Network. That and I was really craving fresh noodles. The place was cheap (price-wise) and delicious! I will definitely have to go back there again in the future.

Sunday was tons more fun. I decided to wear Kurama from Yu Yu Hakusho before the fashion show because after having a conversation about it with Keith, we decided on him since I partially wanted to test shoot my new contact lens. Tifa with blue or green eyes doesn't make sense, nor does Rei with blue or green eyes (and I would've wanted to fix the skirt..)

To quickly cap my day: I didn't sleep all night because I was finishing up Yuna. The El Dorado staff came out pretty good but pretty rickety. Went to the festival with Kevin and Keith. Wore Kurama. Shot with Keith for the lenses test. Forgot craft foam/poster board for Yuna's obi. My friend, Kadishu, ended up buying some for me♥. Met up with Philip. Hung out with them.

Shot for a bit. Shot FOR Keith for a bit. Made a "We love Mario Bueno" sign for Mario Bueno. "Embarrassed" the poor kid. Embarrassed myself by attracting much attention to myself with said sign. Went to get ready for the fashion show at 2:30. Changed into Yuna. Waited backstage at 3:45 to go up. Hung out with all teh models until the show.

Modeling in the Cosplay Fashion show. Got bombarded by people photographing me as Yuna and Mario Bueno as Tidus. Got kicked out xD Shot a bit more, went home.

All in all, this is going to sound a bit cheesy, but I feel really blessed. I'm glad that I could've met so many great friends through cosplaying. Being at the fashion show today and meeting so many talented people is truly inspiring. Everyone was so sweet and nice!

Being around other cosplayers who share the same passion as you and are about the same level is just.. amazing. It makes me want to push myself harder and challenge myself to become better. I saw a lot of friends and made some new ones!

Okay, I'm gonna end the cheesy-ness here xD

Photography by Knightmare6 and Merlin Tong Photography!

Monday, March 7, 2011

eBay Wig Review: rixinyueyi9898

As you know, or don't know, I'll be cosplaying Final Fantasy X Yuna (summoner) this year! I planned on debuting her earlier at SpringFest this Saturday, so last week I ordered her wig.

The wig came out a lot curlier than the image (which isn't an issue). The fibers were really soft. The wig is a bit darker than I had anticipated and wanted for Yuna, but in the light it looks lighter.

The only possible issue I could have with it, is that on the website, it says the fibers were Kanekalon, but then on the tag the wig came with, it says it was synthetic fibers. Not that it mattered either way for me because the fibers were super soft. I'm not sure if it was because it wasn't as thick as my other wigs, but it hardly tangled. There was virtually no tangle with this wig.

What I liked about this wig, and the reason I chose it is that the color looks very natural that it has highlights and such. Nothing too noticeable, but you can tell it's not just one straight color.

Rating: ★★★★★/ 5 out of 5.

Pro:
- Great Quality
- Quick Shipping
- Came with free wig cap
- Soft fibers

Con:
- No tracking number
- Not heat resistant

Price: $24.30 + FREE Shipping. (It was 10% off.)
Item Location: China
Time for Arrival: 10 Days

Would I order from them again? Yes.

If you wish to purchase this wig, search "1813 New long Light Brown Fashion Wavy Wig" in the eBay search bar or look through rixinyueyi9898's ebay profile.

Saturday, February 26, 2011

Tokyo Fashion Festa New York Part 2 Cosplay

I modeled in the Tokyo Fashion Festa last night at FIT! I had a great time and met a lot of awesome people. For the show, I did a revamped version of Hatsune Miku from Vocaloid, in the outfit she wears in the song "Magnet," since the first time I cosplayed it, it was more of a closet cosplay and I didn't have the correct wig.

This time, the dress as completely re-done, new/borrowed wig, and different accessories! The shoes and headphones/hat were the same. The wig I borrowed from the oh so talented cosplayer, Kitsy Dolly (her deviantart). I really wish the event was longer! It felt soo short, but it was so exhilarating! I managed to cram Miku in.. 3 days.. hahaa.. I will never do that ever again! You'd think I learned from AnimeNEXT last year.. but nooo.. Had to do it again.. But she came out great!

Anyways! I want to thank my friends who came out to see me! You know who you are! The experience was just amazing. This was the first time I modeled in a fashion show and the first time for any sort of professional modeling that wasn't TF/TFCD.

I loved it! Met lots of new people and the models were all so talented! Just seeing all the other fashions in the show made me love it even more! I really want to get into Japanese fashion/name brand now.. Well, at least learn about them! Since they are oh so expensive haha. The make up artists were all flown in from Japan, and they did an outstanding job. I just.. can't even.. xD Plus they had really cool clothing haha. One of the make up artists was the lovely Akiko Yoshizawa. She does really beautiful work. (And one day.. I will learn enough Japanese to be able to read her blog.. xD)

After the show we had a tea party/ reception. Had so many pictures taken! It was cute when people told me they loved my character. One mother came up to me with her two sons and told me that her son loves my character haha.

IT ALSO MADE ME WISH I CONTINUED LEARNING JAPANESE! Because the person hosting the event is Japanese, along with all the makeup artists. But I still managed to understand some of it xD It was cute when Akiko was asking me a question about how I did my eyebrows (I colored them blue for Miku) in Japanese, and she realized that she was speaking to me in Japanese xD

I met Tokyo Circus Ringmaster Yoshi. Well, got a picture with him haha. I initially didn't know who he was until I googled his sign. What else.. Oh! All the models received a bottle of FiberWig mascara! Well.. we got some other things as well, but it doesn't top the Fiberwig xD So be on the lookout for a review!

EDIT: Added some YouTube links!


Notable Links:
Tokyo Fashion Festa New York / Official [Facebook]
Akiko Yoshizawa: Hair & Makeup
Purple Sky Magazine: Tokyo Fashion Festa 2 (Cosplay & Makeup)
Knightmare6's Flickr Photography
Covered by Saintilus: Tokyo Fashion Fest at F.I.T.
Through Glass Eyes: Japan Fashion Festa - A Cospay Fashion Show
Crash Culture: Tokyo Fashion Festa @ FIT

YouTube: Introduction to Cosplay
YouTube: Cosplay Fashion Show
YouTube: Hair and Makeup Show
YouTube: Hair and Makeup Demonstration/Lecture
YouTube: Cosplay Q&A

Monday, December 28, 2009

Christmas Festive Nail Tutorial

This is a bit late, but here is a Christmas Nail Tutorial! I hope everyone had an awesome Christmas and Happy Holidays to all! I will post a video tutorial for it later.
All You Need is:
Skin Food White Nail Polish
ABSOLUTE! Nail Polish in Twinkling Gold
ABSOLUTE! Nail Polish in Pine Green
Q-Art Print Red Glitter Nail Polish
Kiss Glass Shine Topcoat
First, begin with clean nails. Get rid of any old nail polish. Use nail polish to remove natural oils. This makes it easier to prevent peeling. I like to use Prep N’Clean Dehydrant by A.S.P. because it dehydrates my nails by removing its natural oils and removes dirt.
Next, apply your white nail polish. Make sure you apply a nice even coat.
Now take your green polish and apply it diagonally across your nails. The one I used is slightly glittery. I used a striper polish for this.
Now it is time for your gold polish. Paint a stripe across, separating the white and the green. Make sure it’s thick enough to be noticed, but not too thick or it looks a little sloppy. [NOTE: I know that I painted the gold polish first, but I realized that it would probably be easier to paint the red nail polish first.]
Next, take your red nail polish and make a few vertical striped on your nails. I used a red glittery polish. If you use a glittery polish, it tends to come out thin, so I made stripes as a guideline so they weren’t too smushed together before thickening the color. I used a striper polish for this as well. It makes the application a lot easier. If you don’t have a striper polish, you can try using tape to align it or use red acrylic paint and a thin paintbrush.
You are almost done! Now apply your topcoat and clean up around the nails. There are two ways to do this. You can use a q-tip soaked in nail polish remover and carefully wipe away the excess nail polish. The problem with this technique is that if you are not careful, you might accidentally wipe away your hard worked painting. But if you are careful you should be fine. The other technique that I like to use is first, to make sure your nails are completely dried. Then soak them in warm-hot water for a little bit. The nail polish on your skin will soften and you can pick it off. Make sure you don’t end up peeling off your skin though!
Now you are finished! Here is your finished product!
I hope you enjoyed this tutorial even though it’s a little late! Stay beautiful!
-Kawaii Riceball

Thursday, November 26, 2009

Nail Max! Inspired Black Sparkly French Tutorial

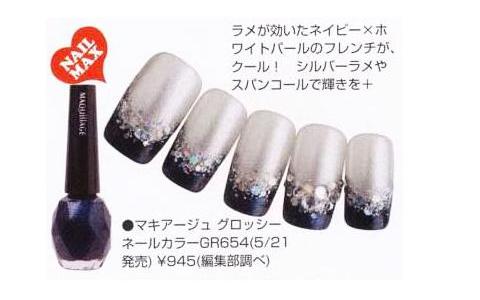
This is a tutorial to help you create elegant and stylish looking nails! This was a look inspired by a look in the Japanese nail magazine, Nail [ネイル] Max! You can check out the video version by click here!

All You Need Is:

Cover Girl’s Continuous Color 3 in 1 in Crushed Pearls
ABSOLUTE! Black Nail Polish
Cover Girl’s Boundless Color Silver Glitter Nail Polish
N.Y.C. Starry Silver Glitter Nail Polish
Silver Glitter, Rhinestones, and Toothpicks
Kiss Glass Shine Top Coat

NOTE: You don’t have to use these specific brands! These are the ones I used :]

Here is the inspiration;

First, prep those nails! I used Prep N’Clean Dehydrant by A.S.P. because it dehydrates my nails by removing its natural oils and removes dirt. This makes it easier to prevent peeling. But don’t worry if you don’t have Prep N’Clean Dehydrant, nail polish remover works just as well.

Now, apply your shimmery basecoat. You can use just a plain silver shimmery one or one with a pink tint. Here I used a shimmery pink tinted polish. This will protect your nails and keep them looking smooth and it helps if your nails are slightly discolored. You don’t need to apply too much.

Next, apply your black polish! I realized that in the picture they used a navy shimmery polish.. But they’re your nails, you can do whatever you want with them haha. Now paint along your ‘C’ curve. If you’re not good at it, that’s all right! Just use smaller strokes. Sometimes you just have to paint how you think it looks. Not everyone’s ‘C’ curve is perfect, and here, the shimmery pink polish made it difficult to see where the curve was. You can also extent the strokes past the ‘C’ curve. This helps make your nails look longer. But remember! If you paint too much past your natural curve, it can look awkward.

Next, you need your shimmery glitter polish! Apply it along your ‘C’ curve. You do not need to apply too much because we will be applying more glitter later on.

Now, apply your Starry Silver Glitter Nail Polish. Apply it the same way you apply your shimmery glitter polish! The main reason I’m using it is for the glitter portion, because the N.Y.C. Starry Silver Glitter Nail Polish has bits of different glitters. Gently dab it on. Do not glob it on! Not only will it take forever to dry, it will come out chunky!

For the next step, you need silver glitter and some toothpicks. It will pick up more glitter this way. Pour a bit of glitter on a piece of paper. The reason for this is so you can pour the excess glitter back into the jar. Also, this type of glitter sticks very easily. If you happen to get it on your table, a moist paper towel should be enough to remove it.

You can break off the tip of the toothpick to make it more blunt. For easier application, dab the toothpick in some clear polish and dab it in the glitter. Apply it along your ‘C’ curve.

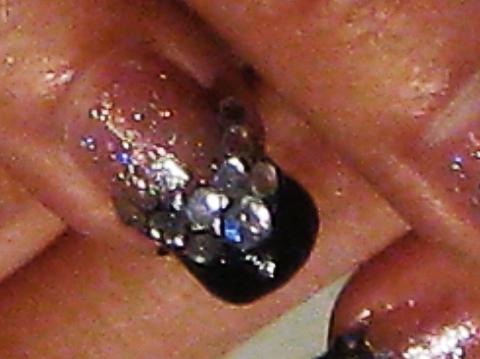
When that’s done drying, get out your rhinestones! I used brush on nail glue to help it stick more. You can also use clear nail polish. I only applied the rhinestones on my ring finger nails. Here I used two different sized rhinestones. Apply the smaller ones along the ‘C’ curve on your ring finger. If you are using nail glue or polish as adhesive, don’t press them on all the way. Just in case you mess up, you can always move them around.

Place the bigger rhinestone in the middle under the smaller stones. Now place two smaller rhinestones next to it.

Finally, your topcoat! For the nails with the rhinestones, apply the topcoat around the stones. You can apply it over, but I’ve never had great results from doing so. So I’d advise you not to. I try to apply a thin layer of topcoat so it does not peel off as easily. And now you are finished!

Here is a picture of my nails using the shimmery pink polish.

And a picture using the shimmery silver polish.

I hope you enjoyed this tutorial! Stay beautiful ^-^

-Kawaii Riceball

Tuesday, September 29, 2009

Midnight Sparkly Nails Tutorial


Here is a tutorial to show you how to create a simple but fashiony look! You can check out the video version by clicking here!
All you need are:
Skin Food Base Coat
ABSOLUTE! Black Nail Polish
Boundless Color Silver Glitter Nail Polish
N.Y.C. Starry Silver Glitter Nail Polish
Kiss Glass Shine Top Coat
NOTE: You don’t have to use these specific brands! These are the ones I used. :]
First start out with clean nails! If you want to prep your nails beforehand, use nail polish remover. This will remove your nails of its natural oils and make it easier to prevent peeling.
Next, apply your basecoat. Here I used one with a pink tint. This will protect your nails and keep your nails looking smooth and if your nails are slightly discolored.
Now apply your color! Here I used black, but you can also vary it and pick another color. Just paint a straight line across. I used a striper brush so it was easier to apply. If you have short nails, use smaller stroke. TIP: For shorter nails, you can paint past the ‘C’ curve to make them look longer. But don’t paint past the middle or it’ll look awkward.
Next your glittery polish! Apply across just like the black nail polish. You can stop here if you want and you’ll have a nice Frenchy look. Also, do not apply too much. Just a thin strip! Remember, less is more.. sometimes.. haha.
Finally, the Starry Silver Glitter! Don’t apply it all the way. Start from a little above the middle to the end. That gives it a more gradual look.
ou can apply a top coat after this step. I didn’t apply one this time, because personally it makes my nail polish peel more easily. But it makes your nails shiny and protects your design ^-^ And here is the final result! You can do other color variations. ^-^