Showing posts with label nail art. Show all posts

Thursday, April 7, 2011

Nail Tutorials.

It has been.. a little over a year since I did nail tutorials. I have hardly been buying nail magazines as well >< (My mom always tells me to buy then in Taiwan because they're cheaper, but I didn't get a chance to the last time I went!) I bought a few at BookOff in NY.. But I've hardly been doing them. Saying school and cosplays don't give me enough time to do them would be a half lie. But, nail art is still one of my passions. So.

I've decided to 'attempt' to invest more time into them like I said I would do in my New Year's resolutions. So the other day I was thinking of nail tutorials I could do. And I figured since it's the beginning of April, that usually means prom season! Actually.. Maybe it's May, I'm not really sure. My prom was in June, which is already pretty late, so.. yeah.

I have 3 looks in mind. For short nails, long squarish nails, and long oval shaped nails. One look will be more simple but party/glam look, another more elegant, and last just.. "blinged out," as opposed to the standard 'French nails.' Someone wanted me to upload a tutorial for what I did for my prom. But I also spent hours on them, so.. I sort of never did that tutorial.

I hope you can understand why.. OTL

Haha this was when I was really into nails! I don't want to ever give that up.

Monday, December 28, 2009

Christmas Festive Nail Tutorial

This is a bit late, but here is a Christmas Nail Tutorial! I hope everyone had an awesome Christmas and Happy Holidays to all! I will post a video tutorial for it later.
All You Need is:
Skin Food White Nail Polish
ABSOLUTE! Nail Polish in Twinkling Gold
ABSOLUTE! Nail Polish in Pine Green
Q-Art Print Red Glitter Nail Polish
Kiss Glass Shine Topcoat
First, begin with clean nails. Get rid of any old nail polish. Use nail polish to remove natural oils. This makes it easier to prevent peeling. I like to use Prep N’Clean Dehydrant by A.S.P. because it dehydrates my nails by removing its natural oils and removes dirt.
Next, apply your white nail polish. Make sure you apply a nice even coat.
Now take your green polish and apply it diagonally across your nails. The one I used is slightly glittery. I used a striper polish for this.
Now it is time for your gold polish. Paint a stripe across, separating the white and the green. Make sure it’s thick enough to be noticed, but not too thick or it looks a little sloppy. [NOTE: I know that I painted the gold polish first, but I realized that it would probably be easier to paint the red nail polish first.]
Next, take your red nail polish and make a few vertical striped on your nails. I used a red glittery polish. If you use a glittery polish, it tends to come out thin, so I made stripes as a guideline so they weren’t too smushed together before thickening the color. I used a striper polish for this as well. It makes the application a lot easier. If you don’t have a striper polish, you can try using tape to align it or use red acrylic paint and a thin paintbrush.
You are almost done! Now apply your topcoat and clean up around the nails. There are two ways to do this. You can use a q-tip soaked in nail polish remover and carefully wipe away the excess nail polish. The problem with this technique is that if you are not careful, you might accidentally wipe away your hard worked painting. But if you are careful you should be fine. The other technique that I like to use is first, to make sure your nails are completely dried. Then soak them in warm-hot water for a little bit. The nail polish on your skin will soften and you can pick it off. Make sure you don’t end up peeling off your skin though!
Now you are finished! Here is your finished product!
I hope you enjoyed this tutorial even though it’s a little late! Stay beautiful!
-Kawaii Riceball

Thursday, November 26, 2009

Nail Max! Inspired Black Sparkly French Tutorial

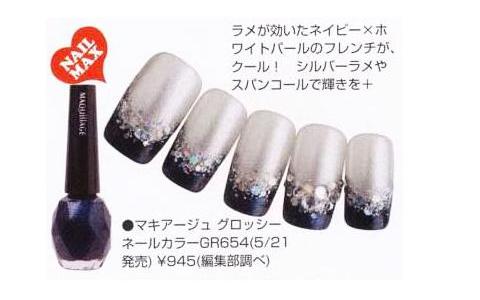
This is a tutorial to help you create elegant and stylish looking nails! This was a look inspired by a look in the Japanese nail magazine, Nail [ネイル] Max! You can check out the video version by click here!

All You Need Is:

Cover Girl’s Continuous Color 3 in 1 in Crushed Pearls
ABSOLUTE! Black Nail Polish
Cover Girl’s Boundless Color Silver Glitter Nail Polish
N.Y.C. Starry Silver Glitter Nail Polish
Silver Glitter, Rhinestones, and Toothpicks
Kiss Glass Shine Top Coat

NOTE: You don’t have to use these specific brands! These are the ones I used :]

Here is the inspiration;

First, prep those nails! I used Prep N’Clean Dehydrant by A.S.P. because it dehydrates my nails by removing its natural oils and removes dirt. This makes it easier to prevent peeling. But don’t worry if you don’t have Prep N’Clean Dehydrant, nail polish remover works just as well.

Now, apply your shimmery basecoat. You can use just a plain silver shimmery one or one with a pink tint. Here I used a shimmery pink tinted polish. This will protect your nails and keep them looking smooth and it helps if your nails are slightly discolored. You don’t need to apply too much.

Next, apply your black polish! I realized that in the picture they used a navy shimmery polish.. But they’re your nails, you can do whatever you want with them haha. Now paint along your ‘C’ curve. If you’re not good at it, that’s all right! Just use smaller strokes. Sometimes you just have to paint how you think it looks. Not everyone’s ‘C’ curve is perfect, and here, the shimmery pink polish made it difficult to see where the curve was. You can also extent the strokes past the ‘C’ curve. This helps make your nails look longer. But remember! If you paint too much past your natural curve, it can look awkward.

Next, you need your shimmery glitter polish! Apply it along your ‘C’ curve. You do not need to apply too much because we will be applying more glitter later on.

Now, apply your Starry Silver Glitter Nail Polish. Apply it the same way you apply your shimmery glitter polish! The main reason I’m using it is for the glitter portion, because the N.Y.C. Starry Silver Glitter Nail Polish has bits of different glitters. Gently dab it on. Do not glob it on! Not only will it take forever to dry, it will come out chunky!

For the next step, you need silver glitter and some toothpicks. It will pick up more glitter this way. Pour a bit of glitter on a piece of paper. The reason for this is so you can pour the excess glitter back into the jar. Also, this type of glitter sticks very easily. If you happen to get it on your table, a moist paper towel should be enough to remove it.

You can break off the tip of the toothpick to make it more blunt. For easier application, dab the toothpick in some clear polish and dab it in the glitter. Apply it along your ‘C’ curve.

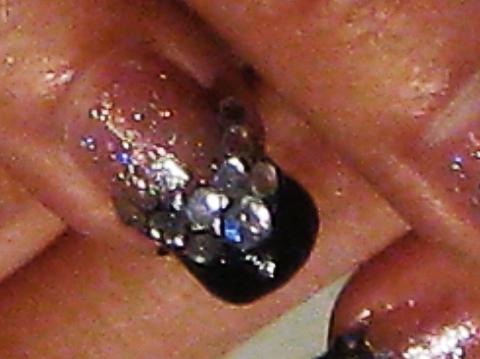
When that’s done drying, get out your rhinestones! I used brush on nail glue to help it stick more. You can also use clear nail polish. I only applied the rhinestones on my ring finger nails. Here I used two different sized rhinestones. Apply the smaller ones along the ‘C’ curve on your ring finger. If you are using nail glue or polish as adhesive, don’t press them on all the way. Just in case you mess up, you can always move them around.

Place the bigger rhinestone in the middle under the smaller stones. Now place two smaller rhinestones next to it.

Finally, your topcoat! For the nails with the rhinestones, apply the topcoat around the stones. You can apply it over, but I’ve never had great results from doing so. So I’d advise you not to. I try to apply a thin layer of topcoat so it does not peel off as easily. And now you are finished!

Here is a picture of my nails using the shimmery pink polish.

And a picture using the shimmery silver polish.

I hope you enjoyed this tutorial! Stay beautiful ^-^

-Kawaii Riceball

Tuesday, September 29, 2009

Midnight Sparkly Nails Tutorial


Here is a tutorial to show you how to create a simple but fashiony look! You can check out the video version by clicking here!
All you need are:
Skin Food Base Coat
ABSOLUTE! Black Nail Polish
Boundless Color Silver Glitter Nail Polish
N.Y.C. Starry Silver Glitter Nail Polish
Kiss Glass Shine Top Coat
NOTE: You don’t have to use these specific brands! These are the ones I used. :]
First start out with clean nails! If you want to prep your nails beforehand, use nail polish remover. This will remove your nails of its natural oils and make it easier to prevent peeling.
Next, apply your basecoat. Here I used one with a pink tint. This will protect your nails and keep your nails looking smooth and if your nails are slightly discolored.
Now apply your color! Here I used black, but you can also vary it and pick another color. Just paint a straight line across. I used a striper brush so it was easier to apply. If you have short nails, use smaller stroke. TIP: For shorter nails, you can paint past the ‘C’ curve to make them look longer. But don’t paint past the middle or it’ll look awkward.
Next your glittery polish! Apply across just like the black nail polish. You can stop here if you want and you’ll have a nice Frenchy look. Also, do not apply too much. Just a thin strip! Remember, less is more.. sometimes.. haha.
Finally, the Starry Silver Glitter! Don’t apply it all the way. Start from a little above the middle to the end. That gives it a more gradual look.
ou can apply a top coat after this step. I didn’t apply one this time, because personally it makes my nail polish peel more easily. But it makes your nails shiny and protects your design ^-^ And here is the final result! You can do other color variations. ^-^