Beauty blog, cosplay blog, fake sweets blog, need I say more?
YouTube ||
My Works ||
Facebook ||
CosplayxModeling Portfolio
Thursday, February 25, 2010
MIA?
Friday, January 15, 2010
Make Up Shelf Life
Blush (Cream): 12-18 months
Brushes: Wash regularly (Lay flat to dry)
Concealer: 12-18 months
Cream & Gel Cleansers: 1 year
Eyeliner (Liquid): 3-6 months
Eyeliner (Pencil): 2-3 years (sharpen regularly)
Eyeshadow (Cream): 12-18 months
Eyeshadow (Powder): 2-3 years
Foundation (Oil based): 18 months
Foundation (Oil free): 1 year
Fragrance/Perfume: 18-24 months
Lip Gloss: 18-24 months
Lip Liner: 1-2 years (Sharpen regularly)
Lipstick: 1-2 years
Loose Powder: 3 years
Mascara: 3 months
Moisturizer: 3-12 months
Nail Polish: 1-2 years
Powder: 2-3 years
Spongers: Wash weekly, replace monthly
2. Smell. Usually you can tell if something goes bad if it smells, same with cosmetics. But that doesn’t mean just because it smells it’s bad. Mascara can sometimes have a distinct smell as its natural smell. But if it smells different after a few months.. It might be bad. The same with lipstick. If lipstick goes bad, it has a distinct smell.
3. Color changes, ex. faded or dullness. If its faded, its probably worn out its working days, or its dried out.. but in either case, it should probably be tossed.
4. If you get an infection from a cosmetic or develop a reaction to it.. STOP USING IT. If you accidentally apply it ON an infection, your best bet is to toss it and buy another to prevent the germs from spreading.
5. Wash your brushes and sponges with a nondrying cleanser. Or buy a brush cleaner!
6. Throw out nail polishes if it’s dried out or clumpy. An alternative to this, which doesn’t work if its already dried out, is nail polish thinner.
7. Avoid sticking your fingers in creams, etc.. Especially if they’re not clean..
8. DO NOT SHARE MAKE UP!
9. Avoid adding water to liquid cosmetics. Water can still contain bacteria and you might end up changing the consistency. (I know some people add oil to their mascaras if its clumpy.. But eh..)
10. Stop pumping your mascara!
Friday, January 1, 2010
Happy New Year! Resolutions?
Now that I’m done with my.. speech.. Does anyone do resolutions anymore? I always thought about doing them every year, but I never got around to actually doing them, or I’d forget. I want to make resolutions. Face it, I’m not getting any younger.. haha just kidding.. What I mean is. Life flies by so quickly. We always say things like live life to the fullest. How many people actually do it? Of course, sometimes there are circumstances that do not allow us to pursue what we want to. But, why live the rest of your life wondering ‘what if?’ I don’t want to look back one day when I’m too incapacitated to do anything about it and wonder why I didn’t do this or that. Who wants to live a life of regret? Of course there are things we do that we regret, but does that mean we should continue living life this way? No! We should continue each day.
For example, (actually this is going to turn into a rant,) but I’ve always wanted to have a blog. Nothing was stopping me. I’ve had.. I would say at least three separate blogs, not including livejournals and such. But none of them have ever lasted. No more of such behavior! The only things stopping me was I’d procrastinate or be lazy about it. Also, I’ve always wanted to be good/better at nail art, and sell my nail art. I’ve made several impressive sets for myself for several occasions.. but.. that’s as far as I got. There are a bunch others but.. I’m going to write a list of resolutions. We’ll see how far I get through them xD
1. Update my blog/Youtube/deviantArt more.
2. Work on my nail art.
3. Work on charms/jewelry.
4. Open an online store to sell such so I can earn money for said cosplays.
5. Umm.. get into art school.
6. Learn how to use photoshop.. the real way..
7. Master[/or close to it] Japanese
8. Learn to sew to make cosplays.
9. Learn how to play the guitar (kekeke) Actually that one’s kind of random..
10. Draw more.
These aren’t in any specific of importance or anything. They’re just in order of when I think of them.
Wahh which reminds me. I’m probably/hopefully (actually more of a most likely) going to be transfering to an art school. I don’t think Biology is really working for me. I thought about it, like I’d love to help animals, and save animals from oil spills and such.. But that’s as far as it goes. I feel like that’s kind of volunteer work. (Omg if it really is tell me where I can sign up
I’ve always had a knack for art. I love art. But at first my parents said I couldn’t do art.. and then I guess they changed their minds later. I know it’s not going to be easy. Then again, nothing is really that simple. But I’m actually excited about picking my colleges for once. I have looked at 13 so far. I don’t want to go too far from home though. I’m going to stay on the east coast hahaa. There’s only one school that I REALLY want to get into.. -gasp- could it be.. my.. top school/choice? Whatever they call it. I never had one of those senior year. I was kind of .. well I didn’t really care. To be honest, my dad picked my colleges. I mean he does that to help.. but no.. I really didn’t care to the point that I applied for whatever colleges my dad picked. But this time, I’m in control. Of course, my mom is helping me because she works in the fashion.. industry? Is that the right word? Well she’s more skilled in that area. So she’s been helping me by suggesting a few schools/checking out the schools I picked and such.
One of the main.. things (perks?).. that I’m looking for in the colleges are the study abroad programs. Of course I’m not going to go to a horrible school if they have a great study abroad program! But I really want to study abroad in Japan. Wahh! I have really really wanted to for the longest time! >< And my main choice has a program where you can study art in Japan
I’m still not 100% sure what I want to do though. But I’m most likely going to go for either Graphic Design or Fashion Design. But most of the high fashion districts are in Europe.. so.. meh.. I don’t know! hahaa and I’d have fun just knowing how to sew so I can make cosplay costumes or my own clothes.. hahaa. OH I can add that to my resolutions! Okay my list looks good/somewhat reasonable ^-^
If anyone knows of a good art school that has a good art program (& study abroad program) in the east coast area, please tell me! ^^ Again, I hope everyone had a happy holiday week/end! :]
Monday, December 28, 2009
Christmas Festive Nail Tutorial
All You Need is:
Skin Food White Nail Polish
ABSOLUTE! Nail Polish in Twinkling Gold
ABSOLUTE! Nail Polish in Pine Green
Q-Art Print Red Glitter Nail Polish
Kiss Glass Shine Topcoat
First, begin with clean nails. Get rid of any old nail polish. Use nail polish to remove natural oils. This makes it easier to prevent peeling. I like to use Prep N’Clean Dehydrant by A.S.P. because it dehydrates my nails by removing its natural oils and removes dirt.
Next, apply your white nail polish. Make sure you apply a nice even coat.
Now take your green polish and apply it diagonally across your nails. The one I used is slightly glittery. I used a striper polish for this.
Now it is time for your gold polish. Paint a stripe across, separating the white and the green. Make sure it’s thick enough to be noticed, but not too thick or it looks a little sloppy. [NOTE: I know that I painted the gold polish first, but I realized that it would probably be easier to paint the red nail polish first.]
Next, take your red nail polish and make a few vertical striped on your nails. I used a red glittery polish. If you use a glittery polish, it tends to come out thin, so I made stripes as a guideline so they weren’t too smushed together before thickening the color. I used a striper polish for this as well. It makes the application a lot easier. If you don’t have a striper polish, you can try using tape to align it or use red acrylic paint and a thin paintbrush.
You are almost done! Now apply your topcoat and clean up around the nails. There are two ways to do this. You can use a q-tip soaked in nail polish remover and carefully wipe away the excess nail polish. The problem with this technique is that if you are not careful, you might accidentally wipe away your hard worked painting. But if you are careful you should be fine. The other technique that I like to use is first, to make sure your nails are completely dried. Then soak them in warm-hot water for a little bit. The nail polish on your skin will soften and you can pick it off. Make sure you don’t end up peeling off your skin though!
Now you are finished! Here is your finished product!
I hope you enjoyed this tutorial even though it’s a little late! Stay beautiful!
-Kawaii Riceball
Thursday, November 26, 2009
Nail Max! Inspired Black Sparkly French Tutorial
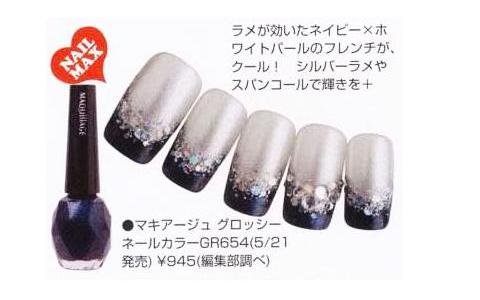
This is a tutorial to help you create elegant and stylish looking nails! This was a look inspired by a look in the Japanese nail magazine, Nail [ネイル] Max! You can check out the video version by click here!
All You Need Is:
Cover Girl’s Continuous Color 3 in 1 in Crushed Pearls
ABSOLUTE! Black Nail Polish
Cover Girl’s Boundless Color Silver Glitter Nail Polish
N.Y.C. Starry Silver Glitter Nail Polish
Silver Glitter, Rhinestones, and Toothpicks
Kiss Glass Shine Top Coat
NOTE: You don’t have to use these specific brands! These are the ones I used :]
Here is the inspiration;
First, prep those nails! I used Prep N’Clean Dehydrant by A.S.P. because it dehydrates my nails by removing its natural oils and removes dirt. This makes it easier to prevent peeling. But don’t worry if you don’t have Prep N’Clean Dehydrant, nail polish remover works just as well.
Now, apply your shimmery basecoat. You can use just a plain silver shimmery one or one with a pink tint. Here I used a shimmery pink tinted polish. This will protect your nails and keep them looking smooth and it helps if your nails are slightly discolored. You don’t need to apply too much.
Next, apply your black polish! I realized that in the picture they used a navy shimmery polish.. But they’re your nails, you can do whatever you want with them haha. Now paint along your ‘C’ curve. If you’re not good at it, that’s all right! Just use smaller strokes. Sometimes you just have to paint how you think it looks. Not everyone’s ‘C’ curve is perfect, and here, the shimmery pink polish made it difficult to see where the curve was. You can also extent the strokes past the ‘C’ curve. This helps make your nails look longer. But remember! If you paint too much past your natural curve, it can look awkward.
Next, you need your shimmery glitter polish! Apply it along your ‘C’ curve. You do not need to apply too much because we will be applying more glitter later on.
Now, apply your Starry Silver Glitter Nail Polish. Apply it the same way you apply your shimmery glitter polish! The main reason I’m using it is for the glitter portion, because the N.Y.C. Starry Silver Glitter Nail Polish has bits of different glitters. Gently dab it on. Do not glob it on! Not only will it take forever to dry, it will come out chunky!
For the next step, you need silver glitter and some toothpicks. It will pick up more glitter this way. Pour a bit of glitter on a piece of paper. The reason for this is so you can pour the excess glitter back into the jar. Also, this type of glitter sticks very easily. If you happen to get it on your table, a moist paper towel should be enough to remove it.
You can break off the tip of the toothpick to make it more blunt. For easier application, dab the toothpick in some clear polish and dab it in the glitter. Apply it along your ‘C’ curve.
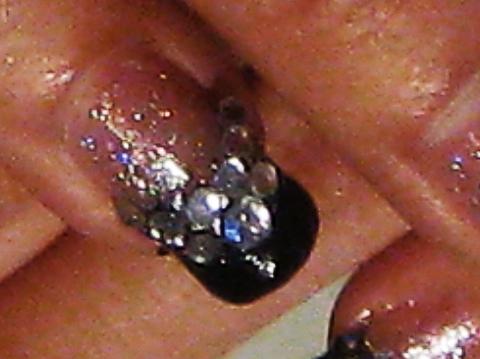
When that’s done drying, get out your rhinestones! I used brush on nail glue to help it stick more. You can also use clear nail polish. I only applied the rhinestones on my ring finger nails. Here I used two different sized rhinestones. Apply the smaller ones along the ‘C’ curve on your ring finger. If you are using nail glue or polish as adhesive, don’t press them on all the way. Just in case you mess up, you can always move them around.
Place the bigger rhinestone in the middle under the smaller stones. Now place two smaller rhinestones next to it.
Finally, your topcoat! For the nails with the rhinestones, apply the topcoat around the stones. You can apply it over, but I’ve never had great results from doing so. So I’d advise you not to. I try to apply a thin layer of topcoat so it does not peel off as easily. And now you are finished!
Here is a picture of my nails using the shimmery pink polish.
And a picture using the shimmery silver polish.
I hope you enjoyed this tutorial! Stay beautiful ^-^
-Kawaii Riceball
Wednesday, November 11, 2009
Kiss New York Pure Fiber Mascara Review
Yayy my first review! Haha. So today I will be reviewing the Kiss New York Pure Fiber Mascara.
Its Claims:
What it is: A big, fuzzy brush mascara with fibers that cling to your lash hairs to create the appearance of a great new set of luxurious, lush lashes.
What it does: Combines a fiber rich formula which meshes with your lashes adding a layer of high pigmented color and lash textured fibers which multiples the length and volume of your natural lash hairs.
What else you should know: This hypoallergenic formula won’t clump or flake and creates a flagrantly bold, lavish lash line that lasts all day without touchup.
The Review:
Pros:
- Lengthened my lashes
- Easy to build up
- Easy removal
- Didn’t really flake
- No basecoat needed
Cons:
- No volume whatsoever
- Clumps, which could be good or bad for some people.
- Brush is indeed massive, so you might get it on your skin easily
- Not waterproof, so if you sweat, cry, or make contact with water, it will run.
- Doesn’t hold a curl, so unless you have long lashes, you’ll probably end up re-curling afterwards.
- Only comes in True Black… which for most.. is a good thing xD
The background story to my discovering this product was that I was in a beauty store, and this caught my eye. I mean.. the bottle is gold for goodness sake! And it was really cheap, it was 3-4 dollars, I can’t remember. But I have a tendency to buy mascaras because.. well.. my eyelashes are puny.. xD And I pretty much fall under the spell of the mascara when they use the words, “length” “volume” “multiply” or “extension.” You get the idea. They use fibers that attach to your lashes to make them look longer. Blah Blah Blah.. All self explanatory.
So! This is my eye without anything.
This is my eyelashes after they’ve been curled.
Now this is after I applied the mascara. You can see that there is definite length. It’s already started to clump because I did a few coats, but it’s okay.. for now.
This is after I waited for it to dry and applied another coat. For the record, I didn’t do one coat, I did a few. You begin to see some thickness. There’s a lot more clumping now and since the fibers make my lashes uncurl, I re-curled them.
And this is the transition!
Would I buy this mascara again? It’s mixed feelings. I probably would because it definitely lengthened my lashes. Whoot! And it was really cheap haha. My only real reason I wouldn’t get it is because it isn’t waterproof, but I’m sure if you put a coat of waterproof mascara over it, it would be fine. There’s also the problem with the volume, but I put coat of Maybelline’s Volum’ Express as a base coat. So if you generally put a layer of volumizing mascara as a base coat, you should be good :] Clumpiness? Well.. there’s nothing you can really do about that.. You can try to use a mascara like CoverGirl’s Lash Blast, (which is a great mascara if you hate clumps) over it. But.. I haven’t tried that yet and I gave it back to my mom when I went back home.. @____@ So.. haha I won’t know. But feel free to experiment! So, yes I’d probably buy this mascara again. :]
I hope you all enjoyed this review! Take care!
From,
Kawaii Riceball
Tuesday, November 10, 2009
Halloween 2009!
Kawaii Riceball